MidiPaw operates on the concept of Performance Rules. These rules translate the physical motion of your hand (Paw!) above the Leap Motion Controller in to MIDI messages such as CC (Continuous Controller), pitch bend, channel aftertouch, articulation changes and motion based notes.
To align with the orientation of the rules, the Leap Motion should be laid flat on your desk or keyboard with the dark sensor glass pointing to the ceiling and the side with the green LED facing you.
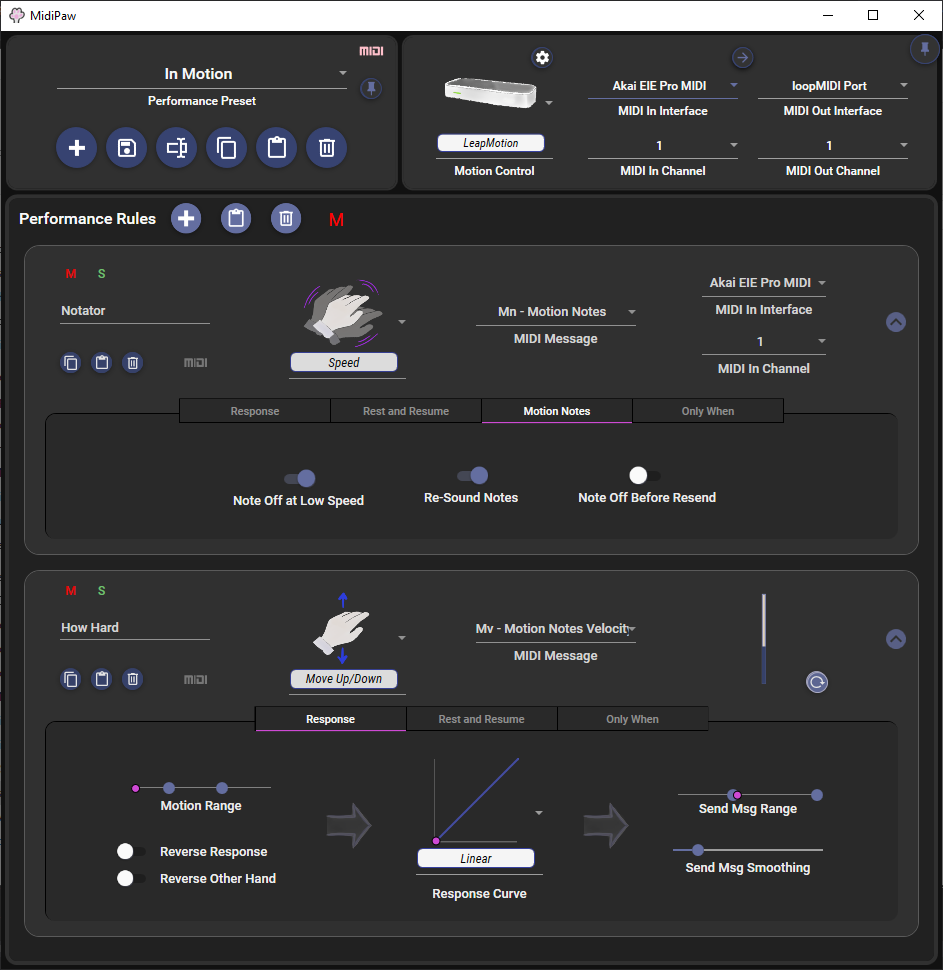
The main screen is divided in to three sections: Presets at the top left, Settings at the top right, and Performance Rules on the remainder of the screen.
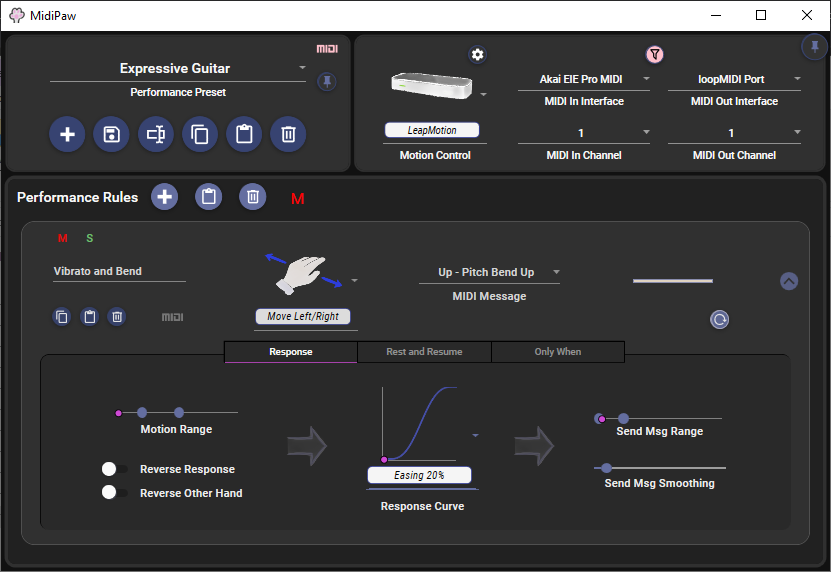
There are additional screens available for Leap Motion Calibration of operating area and hand/finger tracking tuning, screens for configuring Articulation Stacks as well as configuring and managing various aspects of MIDI Automation.
Performance Rules are the heartbeat of MidiPaw and control most aspects of the expression and resulting sound, so let’s start with those!
Performance Rules
The Performance Rules section is the place in which you configure the rules that translate motion in to MIDI controls. At the top of the Performance Rules section is the main rules banner:

Through this banner you may:
- Plus/Add: add a new rule
- Paste: paste a new rule to the top of the stack (from the clipboard)
- Import: import (copy) a rule from any saved preset
- Trash: delete all of the current rules
- Mute: mute all rules from sending any MIDI messages
Pressing Plus/Add will add a new rule to the top of the stack in the Performance Rules section which you can then configure to your needs.
Main Rule View

The main rule header view shows the key aspects of the rule including its name, the motion that controls it, the MIDI message that is sent as a result, and a moving bar indication of the level of the MIDI message currently being sent.
This rule view also contains buttons for a series of actions:
- Mute (red M): mute this rule from sending any MIDI messages
- Solo (green S): solo this rule so that only this rule (and any other rule in Solo mode) will send MIDI messages
- Copy: copy this rule to the clipboard in text format
- Paste: paste a rule from the clipboard to the position after this rule
- Trash: delete this rule
- MIDI: view any MIDI automation that is configured for this rule
- Rotate: rotate the orientation of the MIDI message level indicator (this is useful when using up/down motions in order to not scramble your brain with translated directions)
- Expand: the triangle at the far right will open the rule detail pane to allow deeper customization of the rule
The remainder of the rule header contains the controls by which you configure the basics of the performance rule.
Name
The Name section is simply a place to capture your own meaningful name for the rule. Setting this to something reflecting the behaviour or sound that the rule controls can be visually helpful while playing the preset (i.e. Vibrato or Volume).
Motion
The Motion section is a drop-down selection of all of the available motions that MidiPaw can recognize and translate in to MIDI messages. An image accompanies each motion to illustrate the direction of movement. Three motions are primarily location based (left/right, up/down, fore/back) while others are related more to hand posture (twist left/right, tilt up/down, turn left/right, grab/open, pinch, finger-spread), and still others are speed based (overall speed, absolute speed in three directions – left/right, up/down, fore/back, and directed velocity in the same three directions).
Aligning motions to the intuitive way you would imagine conducting the sounds is a great way to make your presets easy to practice and play. Picture a violin ramping up vibrato — is that a hand tilting up? Pushing deeper away from you? How about a note softly fading away – is that a motion slowly lowering? Trailing off to the left? Twisting counter-clockwise? It’s easy to solo rules and try different motions until you find a motion that feels just right.
MIDI Message
The MIDI Message section allows you to select what MIDI parameter is controlled via the selected motion. MidiPaw currently supports:
- Pitch bend (both directions), Pitch bend up OR pitch bend down
- Aftertouch (channel mode)
- Articulation changes via configuring an Articulation Stack
- Note triggering via Motion Notes and Motion Velocity
- Any standard Continuous Controller (CC) MIDI message
When you select a MIDI message between CC 1 and CC 32, MidiPaw will allow you to configure 14-bit high-resolution MIDI messaging for this rule. If selected, MidiPaw will use TWO CC channels to send the messages – the selected CC number, and the CC that is 32 above the selected number (example CC 1 and 33 together, CC 5 and 37 together, etc). This is per the MIDI specification for high resolution messages. Most equipment and virtual instruments do not support 14-bit messaging so for the most part you probably won’t need to use this option.
In the case of Pitch Bends, it operates differently when configured for bidirectional bend vs the restricted only-UP or only-DOWN message:
- For bidirectional pitch bends:
- The amount of bend being sent is full-down-bend at the minimum of the associated motion, no-bend in the middle of the associated motion, and full-up-bend at the maximum of the associated motion.
- An additional GUI parameter will appear allowing you to set the Snap to No Bend strength which affects the size of the central movement area that corresponds to no-bend.
- Being centrally based, this style of pitch bend works well with the bidirectional velocity (not speed) motions to produce a wobble-vibrato type of effect.
- For only-Up or only-Down pitch bends:
- The amount of bend being sent is no-bend at the minimum of the associated motion, and full-bend at the maximum of the associated motion.
Message Level Indicator
The Message Level Indicator allows you to visually monitor the level of MIDI message “signal” that the rule is sending to the MIDI interface.
In the case of pitch bends, aftertouch and standard CC messages, the indicator is a bar showing the value being sent. The bar may be oriented horizontally or vertically via the rotation button in the lower right area of the section.
In the case of articulation stacks, the indicator is a continuously rolling sequence of articulations with the currently selected articulation highlighted. As your motion causes the articulation stack to move, the articulations are triggered in sequence by either sending keyswitch message or CC messages as configured in the Articulation Stack window, accessed by hitting the three lines in the upper right corner of the section. Like the indicator bar, it can be oriented via the rotation button in the lower right area of the section.
In the case of motion notes, the indicator is replaced by a MIDI interface selection – the motion notes feature will read notes from this interface, but will not pass them through to the MIDI out interface until your hand motion triggers them.
Articulation Stack
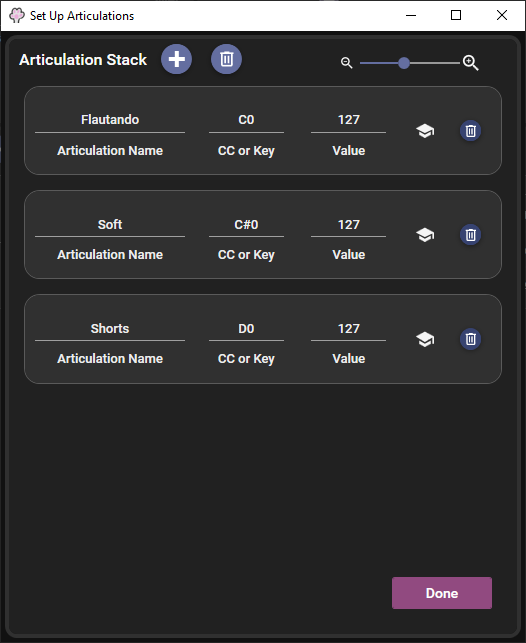
The Articulation Stack setup window allows you to configure a sequence of articulations / sounds that may be a part of a virtual instrument that you’re controlling, such as long vs spiccato sounds in a string patch. You can enter a name for the articulation that will show in the main rule header as you play to help remind you where you are!
Articulations change messages can be sent either via:
- Keyswitch
- A MIDI note is sent at a configured velocity (value, 0-127) to switch to the noted articulation
- To select Keyswitch you can:
- Press the learn button (graduation cap) and press a key on your keyboard, OR
- Enter the note name and octave (like A#2, G1, etc) in the CC or Key field.
- Continuous Controller
- A CC message of the specified type is send with the specified value (0-127) to switch to the noted articulation
- To select CC you can:
- Press the learn button (graduation cap) and wiggle the CC on your MIDI controller, OR
- Enter the CC number (like 31, 17, etc) in the CC or Key field.
Articulation Switch Triggers
Articulation stack rules will send the keyswitch or CC message corresponding to the currently active (blue/grey) articulation entry in three situations:
- When the articulation stack shifts from articulation a to articulation b, it will send the switch for articulation b.
- When the articulation stack shifts from outside of the configured Response page Motion Range to within the motion range, landing on articulation a, it will send the switch for articulation a.
- Note that the Motion Range min and max must not be at the extreme ends to enable this. At settings of 0 or 1 it’s not possible to get “outside” of the response range, so a re-trigger of the keyswitch won’t happen.
- This kind of triggering is ideal for ranges of motion where you have one or more articulations and you want to send a keyswitch if the player moves from outside the range to inside the range – and is particuarly effective if there are multiple pose-based articulations (like pinch for pizz and tilt for marcato in two separate rules).
- When the articulation rule becomes active (either by its conditions being satisfied if it has an “only when” page set up, or by coming off of mute), and is scrolled to articulation a, it will send the switch for articulation a.
Articulation Martial Arts
While some VSTis provide many, MANY articulations, it’s pretty impractical with hand motion to try to control more than two or three with any accuracy, especially while simultaneously moving in other dimensions to control other aspects of the sound. There are no limits, though, on the number that you can set up in a stack if you’re feeling especially creative or if you have kung-fu master hand motion accuracy!
Detailed Rule Configuration
Clicking the expansion triangle at the far right of each rule will expand the detailed rule configuration panel that allows deeper customization of the rule. This is the key to the expressive possibilities of MidiPaw and you will undoubtedly tweak these details for every effective rule.
The detailed rule configuration panel is divided in to a series of pages, depending on the main settings of the rule. The pages are:
- Response
- Rest and Resume
- Motion Notes
- Only When
Detailed Configuration: Response
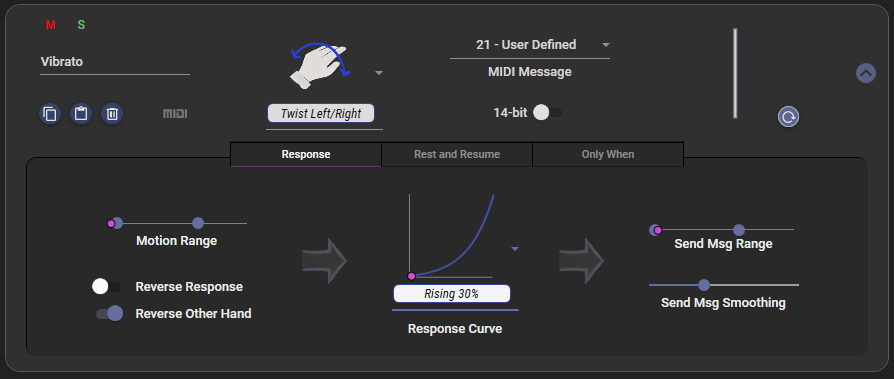
The Response detailed panel allows you to configure the way in which motion is directly translated in to MIDI messaging:
- Motion Range
- The range of tracked motion (a subset of the full working range that you can set in the Leap Motion calibration settings, below) that will trigger this rule
- Motion outside this range will have no effect on this rule and no resulting MIDI messages will be sent
- Reverse Response
- Causes the motion interpretation to be reversed prior to processing by the rule settings
- Reversing is useful when you want the resulting action to be the opposite of the motion — for example, moving your hand right as a mute or damper action and wanting a lower CC value to be sent via the CC message as you move right
- Reverse Other Hand
- Like the Reverse Response option, above, but the reversal only occurs when you begin using your other hand. This is most useful for motions like hand twists where twisting inward is intended to increase the CC message with either hand, but can be applied to any motion
- Response Curve
- These curves represent how the observed motion amount (shown from min to max along the horizontal axis of the graph) is translated in to the magnitude of MIDI message to be sent (shown from min to max along the vertical axis of the graph)
- The response curves also affect how the transitions are shaped in the articulation stacks relative to the observed motion
- Send Msg Range
- This range defines the lowest and highest CC or bend message values that will be sent as a result of the observed motion.
- Motion observed at the low end of the Motion Range will result in a message value at the lowest Send Msg Range bound while motion observed at the high end of the Motion Range will result in a message value at the highest Send Msg Range bound, with the transition between low and high controlled by the Response Curve
- Send Msg Smoothing
- The Send Msg Smoothing setting allows you to apply smoothing or damping to the motion of the final value sent via the selected MIDI Message
- Smoothing is achieved by taking a rolling moving average (shorter or longer, depending on the setting), and sending that result through the MIDI Message
- A higher smoothing value increases stability in the interpretation of the motion, but it in turn lowers the responsiveness of the motion
Detailed Configuration: Rest & Resume
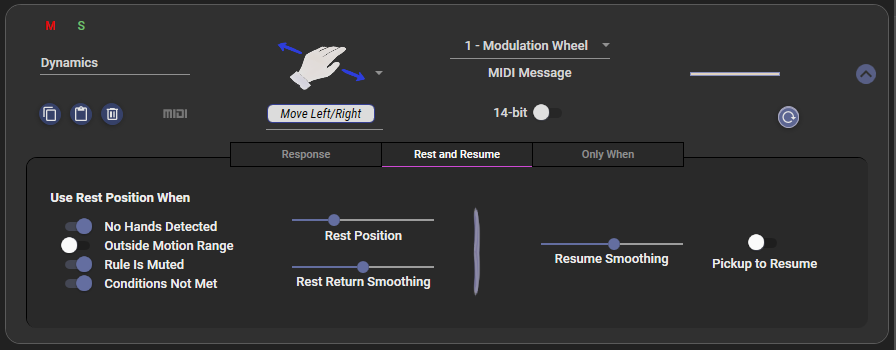
The Rest & Resume page allows configuration of how the rule responds when it is leaving and entering an active state, with the goal of maintaining some degree of continuity between control events as well as ensuring that settings don’t get “stuck” in an undesirable position.
When leaving an active state the rule will respond according to the Rest settings, and when entering an active state, the rule will respond according to the Resume settings. Rules are considered inactive as follows:
| Inactive Rule When Any Are True: |
|---|
| Hand motion is NOT detected |
| Motion position is outside configured Motion Range AND the Rest When Outside Motion Range option is selected |
| Rule is muted |
| Any “Only When” condition is not met |
The settings are organized in two halves — Rest settings on the left half of the panel, and Resume settings on the right side of the panel. Available settings are:
Rest Settings
- Use Rest Position When
- If any of the selections are on, the resting motion position when that event happens (represented by the pink ball on the Motion Range control in the Response page) will be determined by the other two resting parameters.
- If off, the resting motion will remain wherever it was when the rule became inactive for the corresponding reason.
- The available triggering events to begin resting are:
- No hands are detected
- Motion moves outside the configured Motion Range
- The rule is muted
- The Only When conditions are not met
- Rest Position
- Sets the final resting position of the motion (pink ball!) when a rule is inactive. It will travel to this position at a speed based on the rest return smoothing setting.
- Rest Return Smoothing
- Sets the amount of smoothing or damping applied as the motion moves to the resting position. At lower settings it will achieve resting position quickly and at higher settings it will move slowly to the resting position. It will take just over one second to fully rest at the highest setting.
Resume Settings
- Resume Smoothing
- Sets the amount of smoothing or damping applied as the motion moves from the previous or resting position to meet the tracked hand motion position. At lower settings it will reach the active motion position quickly and at higher settings it will move slowly to the current position. It will take just over one second to fully resume at the highest setting.
- Pickup To Resume (aka “Sticky Pickup”)
- If selected, a resting rule will not interpret any motion when it becomes active again until the actual tracked motion (represented by the white circle on the Motion Range) crosses through the resting position (represented by the non-outlined pink ball) and “picks up” the motion where it left off. It’s a little hard to describe well, but you’ll get it right away when you try it 🙂
Detailed Configuration: Only When
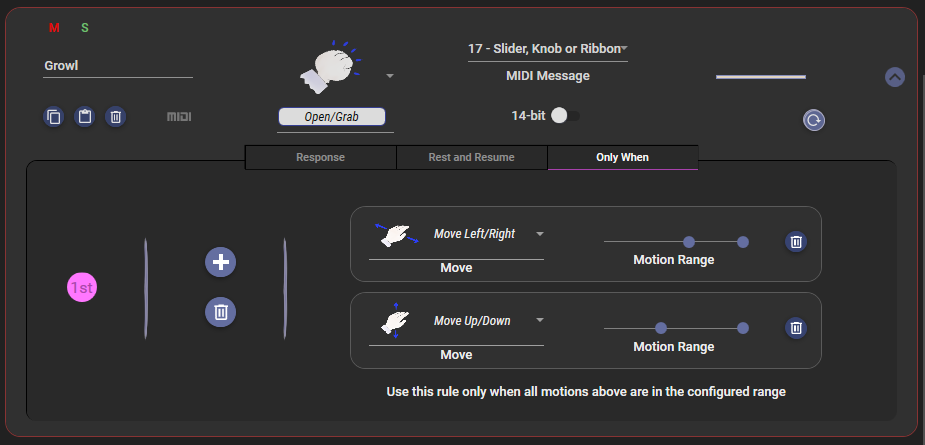
The Only When page (aka “Conditional Rules”) lets you specify motion based range conditions that must ALL be true in order for the particular performance rule to be actively processing motion and sending MIDI messages. It’s designed to limit control of some rules to specific locations in your working space, or to provide a way to multiply the possible rule combinations – such as a left-to-right rule that only applies when you’re making a fist, and a left-to-right rule that only applies when you’re not.
Conditions can be added by clicking the “+” button on the left of the panel, and all conditions can be deleted by clicking the trash can button on the left of the panel. Individual conditions can be deleted by clicking the corresponding trash can.
There are two settings for each condition:
- Move
- Sets the movement or posture that will be evaluated by this condition.
- Motion Range
- Sets the range in which the selected movement or posture must sit in order for the condition to be satisfied.
There is one special condition set with the “1st” (first) icon on the left:
- 1st
- If set, this rule will be active ONLY if it is the first active one… that is, only if there is no other rule before it (higher in the list of rules) that is also active and configured to send the same MIDI message.
- This approach is useful for a catch-all for a particular midi message. For example, there may be a variety of articulation stack rules with various conditions above, and a final articulation stack can be set to send “normal” or “default” with the “1st” condition as a final rule to ensure that when none of the others are active, the normal setting is restored.
When ALL conditions are satisfied at the same time (or when no conditions are configured), the overall performance rule is considered active and will operate like any other rule. When ANY condition is not satisfied, the overall performance rule is considered inactive and will show with a slightly red border to highlight this, and it will not interpret motion or send any MIDI messages. Any resting and resuming settings will apply as these rules move between active and inactive states.
Detailed Configuration: Motion Notes
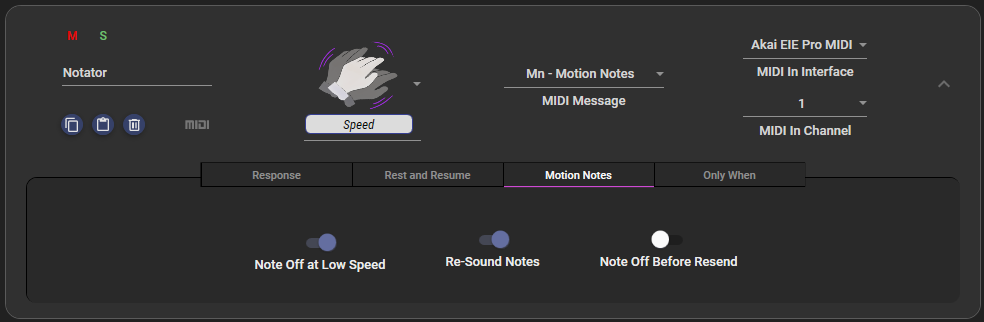
The motion notes panel contains three options that help shape the way in which MIDI messages are sent relative to the motion. Please see the Motion Notes section, below, for details of these settings.
Motion Notes
Motion Notes allows you to use your paw motion to trigger sending notes through to the main MIDI output, making actions possible like air-plucking, air- drumming and even air-bowing with simulated dynamics. The Motion Notes configuration screen contains a few additional settings:
When the MIDI Message type “Mn – Motion Notes” is selected, the performance rule changes to include settings for MIDI Input. MidiPaw will accept notes from this MIDI Input but will retain them until you make the appropriate motion to trigger a Motion Note. MidiPaw will then send your notes through the MIDI Output to your virtual instrument. By connecting your virtual instrument only to the virtual port that MidiPaw is using, you can use your movements to control the timing of the notes that you’re playing on your keyboard.
Motion Notes work slightly differently depending upon whether you have selected a speed-based motion or a postional/pose-based motion.
- Speed-based Motion Notes Control:
- When the motion goes over the maximum amount in the motion range, all held notes will be sent for playing. If the option to re-sound notes is selected, any already-playing notes will be sent again.
- When the motion goes under the minimum amount in the motion range, and if the option to send a MIDI note off for low speed is chosen, any already-playing notes will be sent a note off command.
- Positionally-based Motion Notes Control:
- When the motion goes over the maximum amount in the motion range, all held notes will be sent for playing. If the option to re-sound notes is selected, any already-playing notes will be sent again.
- When the motion goes under the minimum amount in the motion range, all held notes will be sent for playing. If the option to re-sound notes is selected, any already-playing notes will be sent again.
- If the motion range setting is either at the extreme minimum or extreme maximum, it will not be used to trigger Motion Notes. In this way you can “park” one of the min or max and have a single point in space that you can pluck to send notes.
There is one additional setting that controls whether or not a MIDI note off is sent prior to MidiPaw re-sending an already-playing note. Some virtual instruments require a note off before another note on. This option should be selected if you find notes getting “stuck” on your virtual instrument.
It’s often helpful for expression to include other related motion control when you are using Motion Notes. For example, using the left and right speed motion to control a small change in dynamics or volume can simulate the brief change in tone as a musician might change bow direction.
Overall, Motion Notes probably isn’t applicable to serious music production, but it is a fun feature to explore and with some tweaking you can achieve pretty satisfying virtual bowing feel!
Fine Tuning Your Rules
There are numbers on the configuration sliders and ranges in MidiPaw only when you are actively setting them. Waving your “paw” around to control sound is an inherently approximate endeavor, so the rules are best be tweaked by feel and by sound.
To aid fine tuning, the detailed rule configuration panel includes little pink dots or white circles that slide along the ranges and response curves showing the position of the observed motion. You can achieve best results by setting up the rules while your hand is in motion over the controller, and you are listening to the results by playing the virtual instrument while fine tuning.
It’s often helpful to Solo the rule while fine tuning to ensure that the audible impacts of tweaking are actually a result of the configured motion and the changes to the parameters.
Presets
The Presets section allows you to save and recall entire setups, including the Settings and Performance Rules sections. Once you have MidiPaw behaving as you like for an instrument, say for Orange Tree Sample guitars, you can hit the PLUS symbol to save the setup as a new preset, giving it the name that you like.
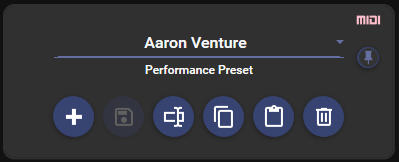
There is an additional row of controls in the Presets section that includes:
- Save: update the currently loaded preset
- Rename: rename the currently loaded preset
- Copy: place a text version of the preset on the clipboard
- Paste: add a new preset to MidiPaw from the clipboard
- Trash: delete the currently loaded preset
- MIDI: configure MIDI automation for preset switching
- Pin The Preset: Will reload the latest preset on next launch
Cutting and Pasting and Sharing Presets
Presets in MidiPaw are stored in the application* and are managed through the Presets section of the screen. Each preset is represented by a text description of its components and configurations, and by using the Copy capability you can place this text on your Windows clipboard. From here you can do things such as save it as a means of backup, post it on your web page, or email it to a fellow MidiPaw user.
When selecting Paste, MidiPaw will create a new preset based on the preset from the Windows clipboard.
* In a pinch, you can access the settings file that contains the presets by surfing to C:\user\App Data\Local\MidiPaw and finding the appropriate software version folder and install instance, under which you can find the plain-text user.config file from which you can cut and paste your presets
Unique Preset Names
When either saving as a new preset OR pasting in a preset from the Windows clipboard, MidiPaw will ensure that a unique name is used by adding numeric increments to the end of the name. For example, if you try to save as a new preset “Great Rules” and such a preset already exists, yours will be saved as “Great Rules 2”. If your intent was to overwrite “Great Rules”, simply delete the original and rename the new preset (OR start in the first place by loading Great Rules and modifying and then saving it).
Settings
The Settings section allows selection of the motion controller (currently only a single Leap Motion controller is supported), the MIDI interface and the MIDI channel through which MidiPaw will listen for MIDI Automation messages, and the MIDI interface and the MIDI channel through which the MIDI messages will be transmitted to control your instruments.
There also happens to be a Purple Push Pin up in the corner too that can be used to keep the MidiPaw window always on top of other windows. This is handy if you wish to see the MidiPaw interface while working in your DAW or other software.
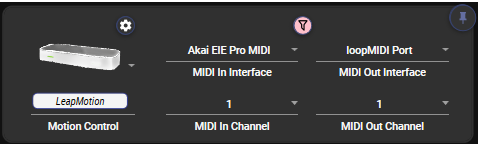
MIDI Input Settings
Touching first on MIDI, the MIDI Input settings in this section apply to MidiPaw receiving MIDI messages to be used for MIDI automation purposes. When set to an interface or “Omni” mode, MidiPaw will compare any inbound Program Change, Continuous Controller or Key events with automation configured for MidiPaw’s controls and apply the message accordingly.
Note that MIDI input of notes and velocities for the purposes of Motion Notes are received from the MIDI interface set directly in the Motion Notes rule, not the overall MIDI In setting that is used for automation.
MIDI Thru Settings
Between the MIDI In and MIDI Out settings is a small circular button to control the MIDI Thru properties of MidiPaw. The button has three states, cycled through by clicking:
- Unlit Arrow: No MIDI In will be echoed to MIDI Out
- Lit Arrow: All MIDI In (except SysEx) will be echoed to MIDI Out
- Lit SmartFilter: All MIDI In (except SysEx) will be echoed to MIDI Out except when there is a rule configured for that same MIDI message. For example:
- If you have a rule in the current setup for CC 1, no CC1 messages will flow through from In to Out
- If you have a rule for Motion Notes in the current setup, no Note messages will flow through from In to Out.
The MIDI Thru functionality can simplify the task of connecting MidiPaw with your DAW and with the SmartFilter mode can reduce the chance of conflicting control messages happening from different sources at the same time.
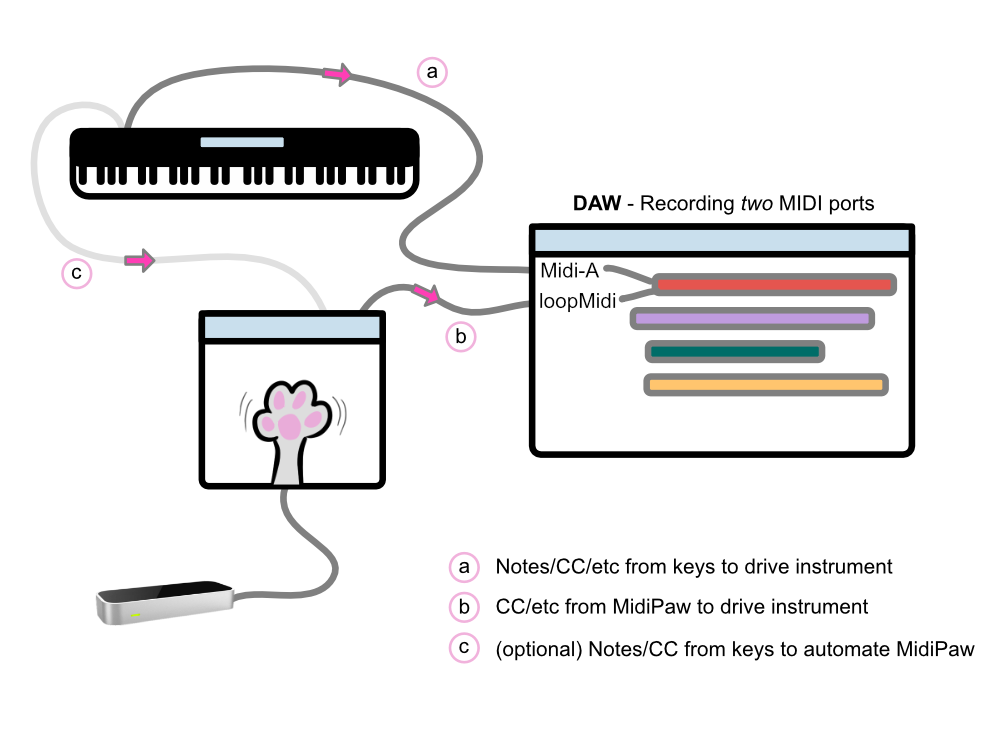
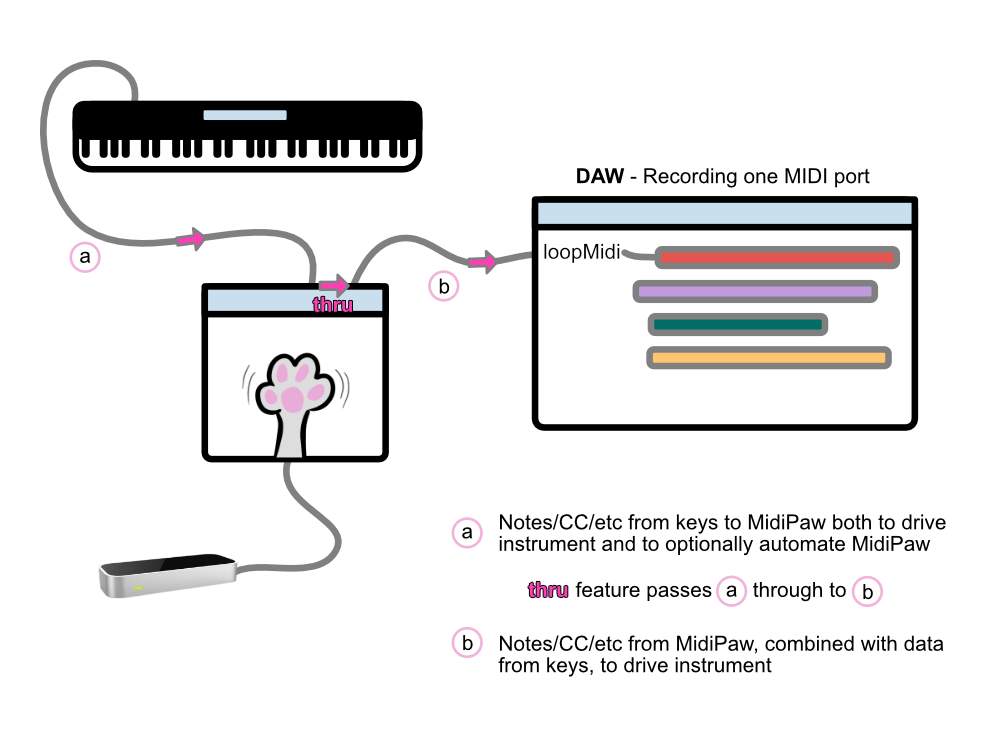
MIDI Path with Thru Options
The following diagrams show the logical signal path of the MIDI signals that you can use in a non-Thru mode and a Thru mode respectively.
MIDI Output Settings
The MIDI Output settings in this section apply to all performance rules in the application, which will all send messages through this path. Typically this will be set to a virtual/loopback MIDI device such as LoopMIDI (see the Download page for links to the provider of this package). Your DAW can then be set to receive MIDI from this loopback device (or all MIDI inputs) in order to receive the MIDI messages from MidiPaw along with the MIDI messages from your controller keyboard that is playing the notes for the VSTi virtual instrument in your DAW.
Motion Control Settings
The Motion Controller drop down allows you to select the motion controller to be used with this instance of MidiPaw. Currently this drop down contains exactly one choice, the Leap Motion controller, making the selection easy!
If the Leap Motion is plugged in, version 4 of the software is installed, the Leap Motion Control Panel is running, and tracking is enabled (a green Leap Motion icon in the task bar), then everything will track well. If not, the Leap Motion icon will display a “Not Found” overlay and no tracking will occur.
For advanced control of the tracking for each preset, there is a gear icon above the Leap Motion to enter advanced calibration mode.
Leap Motion Calibration
MidiPaw allows you to configure the physical working space of the tracking range of the Leap Motion to be used with the preset, configure the finger tracking factors that determine the overall position of the hand, as well as configure the dgree of smoothing for speed-based motions. Hitting the gear icon on the Leap Motion brings up the first calibration window:
Working Space
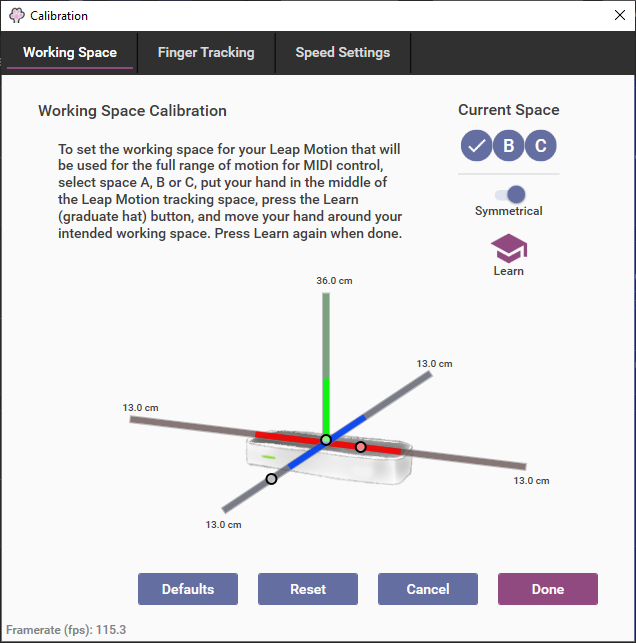
MidiPaw allows you to configure three separate working spaces (slots A, B and C) to easily accommodate users who use their Leap Motions in different locations. Working space distances can be set to be always symmetrical about the center of the Leap Motion, or can be a freeform poisition in space. They can be set only by using the Learn function. To set the working space, select the slot you wish to configure (A, B or C), place your hand directly over and close to the Leap Motion, then press the Learn button and slowly move your hand through the full extent of the area in which you wish to work. You will see the color highlighting where you have moved. This will be the maximum tracked area.
When you are satisfied with the working space, press Learn and then Done to exit the screen. If you are not satisfied or if you move too far, simply press the Learn button to stop learning, place your hand directly over the Leap Motion, press Learn and start again.
It’s pretty intuitive after one or two tries 🙂
For more nuanced control of how the Leap Motion interprets your movements, you can switch to the Finger Tracking tab of the calibration window:
Finger Tracking for Hand Position
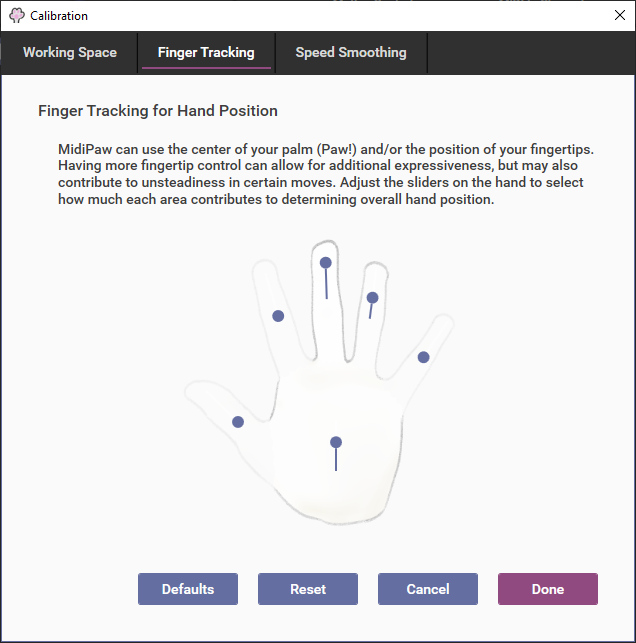
MidiPaw uses the overall position of your hand to determine activity for the Left/Right, Up/Down and Fore/Back motions. By default, this position is determined by the middle of your palm.
By using the sliding controls on the image of the hand in the finger tracking page, you may set the degree to which individual fingertip locations contribute to the calculation of hand position. With sliders pushed up (and that portion of the hand showing less translucent), the corresponding hand part will be considered more heavily in determining overall hand position, while those parts with sliders pushed all the way down will not be considered at all.
For those who care about the math, overall position is determined as weighted sum in all three dimensions of the positions of the fingertips and the palm center, with the weights on each ranging from 0 (not a factor) to 5 (strongest factor) according to the sliders.
Generally, turning up the weights of the pointer, middle and/or fourth fingers in addition to the palm will allow you to extend or wiggle those fingers to influence overall position which is very useful for more subtle types of actions such as manual vibrato through pitch or volume “wiggling”.
Speed Smoothing
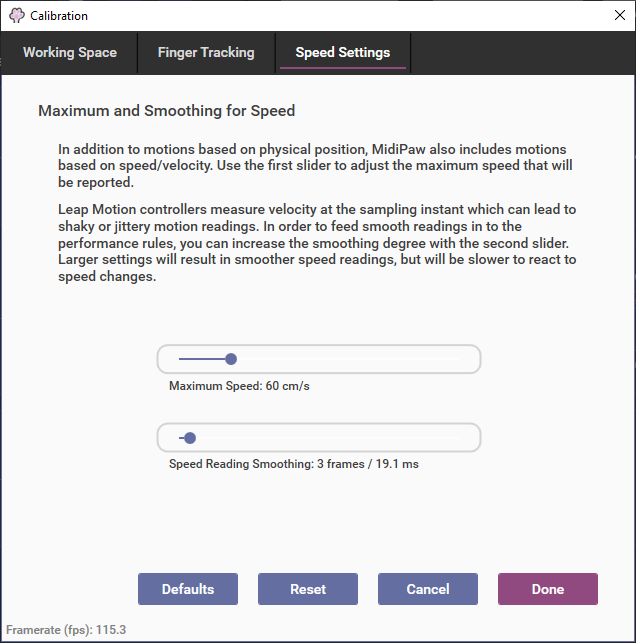
You may configure the maximum detected speed that MidiPaw will recognize by moving the first slider in the Speed tab. The speed set here will represent the full range of speeds that will be used over the full length of the Motion Range setting on the rule Response pages.
Speed is measured in a particular instant by the Leap Motion, and this setting allows you to select a degree of smoothing or averaging before the speed is processed through the performance rules that use speed-based motions. This can greatly improve the stability and playability of the related motions.
MIDI Automation
You can control several aspects of MidiPaw through MIDI automation, in which messages received on the overall MIDI Input port and channel can be used to set levels of different controls and configurations, and to switch between active presets.
Preset Automation
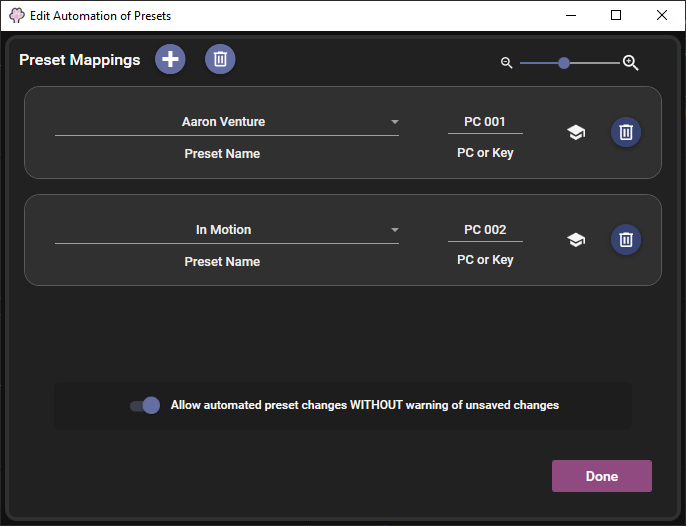
Pressing the “MIDI” indicator at the top of the Presets section in the main window will bring up a window through which you can configure the Program Change or Keyswitch (note on) messages that will cause the corresponding preset to be loaded in to MidiPaw. There are a two components to setting up this automation:
- Preset Name:
- Select the preset for which you would like to assign automation. If a preset was loaded at the time you opened the automation window, and it wasn’t already automated, the first row will be prepopulated for you with the currently active preset.
- PC or Key:
- Select the PC (Program Change) number or the Keyswitch (note name) that will be used to select the corresponding preset.
- To select PC you can:
- Press the learn button (graduation cap) and press the corresponding Program Change button on your MIDI controller, OR
- Enter the PC number (like 31, 17, PC 12, PC 002, etc) in the PC or Key field.
- To select Keyswitch you can:
- Press the learn button (graduation cap) and press a key on your keyboard, OR
- Enter the note name and octave (like A#2, G1, etc) in the PC or Key field.
There is also an overall setting to control the way in which preset switching responds when switching a preset while a modified preset is already active. If you engage “Allow automated preset changes WITHOUT warning of unsaved changes,” then when you send the automated program change, MidiPaw will discard any unsaved changes to the current preset and load the corresponding automated preset. If this setting is not engaged, MidiPaw will warn you of unsaved changes via a confirmation message that you will have to answer, thereby kind of killing the point of automation.
Detailed Control Automation
MIDI automation is available for many of the detailed control buttons and settings across the Performance Rules. It can be configured for:
- Overall Mute button (at the top of the performance rule section)
- Mute and Solo buttons for each rule
- Detailed Response settings except for selection of the Move
- Detailed Rest and Resume settings
- Detailed Motion Notes settings
MIDI automation of these detailed controls supports either keyswitches or CC messages. The controls will respond differently depending on the type of control and the type of message that is configured, as follows:
| Keyswitch | Continuous Controller | |
|---|---|---|
| Button or On/Off Setting | If velocity < 64, turn button off. If velocity > 64, turn button on. | If CC value < 64, turn button off. If CC value > 64, turn button on |
| Slider or Multi Value Setting | Set the value of the slider proportionally by the velocity of the keyswitch press | Set the value of the slider proportionally by the value of the CC message |
Detailed MIDI automation is engaged by right-clicking on the control for which you would like to establish (or remove) automation. A small window will appear:
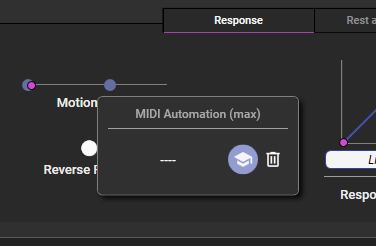
The detailed MIDI automation works only in Learn mode (i.e. you can’t type in a key or CC number directly). To set the message to automate the control, press the Learn (graduation cap) button and then press the desired key or wiggle the desired continuous control on your keyboard or control surface. MidiPaw will receive the incoming message and assign the control accordingly. In the event that you send the wrong key or controller, simply press the Learn button and try again.
You may remove detail control automation by clicking on the trash can icon.
To assist in keeping track of what controls have and do not have automation associated with them, there is a small “MIDI” indicator in the lower left area of the rule header that will light up with pink when automation is configured. Clicking on this indicator will bring up a list of configured automations through which you may update or remove individual settings:
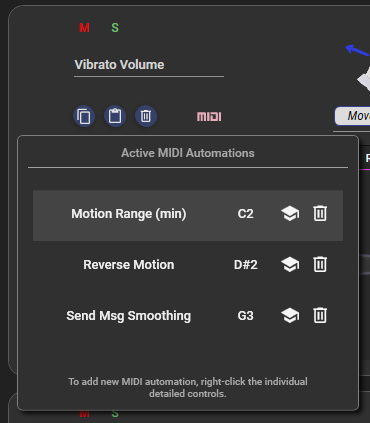
As with the individual automation settings, you may click the Learn (graduation cap) button in order to update any existing automation and you may click the garbage can button to remove the automation. New automations are still added by right-clicking the desired control.
Minimize to Tray
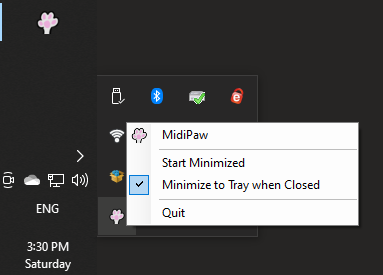
By default, MidiPaw will minimize to the taskbar / tray icon area when the main window is closed, and it will keep processing movements and midi control messages. It will issue a notification once per session to remind you that this is the case.
This setting may be changed by right-clicking on the tray icon for MidiPaw where it may be enabled, along with electing whether to start minimized. Clicking on the tray icon or on the MidiPaw menu item in the context menu will restore MidiPaw’s window to the screen.
The End!
Thanks for reading this far, and I hope you try and find some use for MidiPaw! I use it in my regular playing very frequently, and thought that others might find it useful as well.
Please check out the Contact page where you can send me any ideas you might have for features or improvements (or report bugs!), and where you can subscribe to my mailing list in order to receive a notification of significant events such as a version upgrades. If you like and use MidiPaw and wish to support this effort and encourage continued evolution of the tool, there’s a page where you can Donate any amount you wish!